Monday 2 February 2015

Useful linux command lines

      These examples are run using putty. Know more about putty here
You can find the download links at the end of this page.

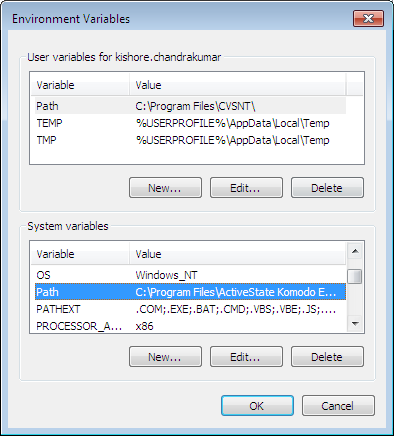
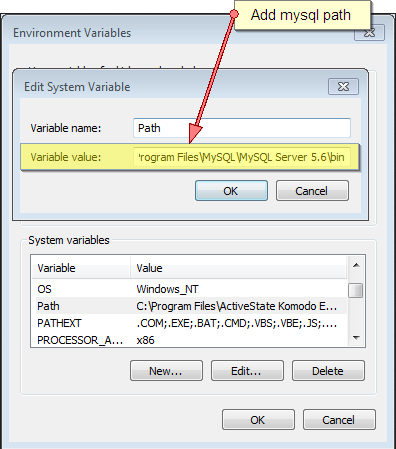
Once installed Putty, Add the putty path to the System path so that it becomes easy to access the executable.
To add variables to System path refer to Setting up Environment variable section .

File Transfer

Window to Linux

1. Open command prompt or run Ctrl+R, Type cmd to open the Command prompt.

  
2. In command prompt type in the following commands.
pscp source <filename> <user>@<host>:<destinationpath>
pscp source c:\test\test.txt test@example:/home/test/Desktop
 The console ‘ll prompt for password, enter the password and press enter.
The file transfer ll start copying the files.

Linux to Windows

3. In command prompt type in the following commands.
pscp <user>@<host>:<source path> <destination path>
The console ll ask for password, enter the host password and press enter.

Moving files

sudo mv <source> <destination>
sudo mv /home/test/test.txt /var/www/test.txt

Renaming Files

 Simple rename command
sudo mv <oldfilename> <newfilename>
Sudo mv test1.txt test.txt

Zipping and Unzipping a file

Zipping a file

zip <zipfilename> <filename>;
zip test.zip test.txt

Unzipping a file.

unzip <zipfilename>; // unzips to the current directory.
unzip <zipfilname> -d <foldername> // unzips to the particular directory.
// If the folder is not present folder is created 

Extracting a tar.gz file

           tar -xvzf <Tarfilename>;  // extracts to the current directory.            
           tar -xvzf <Tarfilename> -C <directory name>;  // extracts to the specified directory.
           tar -xvzf <Tarfilename> --directory <directory name>;  // extracts to the specified directory.

Restart Apache service 

sudo /etc/init.d/apache2 restart // older version of ubuntu
sudo service apache2.restart //newer version of ubuntu 

References

1. Download all Putty executables under one zip here
2. Download the Putty installer from here

Monday 11 August 2014

MYSQL common functionalities.

Here are some of the basic functionalities of mysql
1. Installing a mysql Server.
2. Setting up the system environment for mysql.
3. Starting and terminating mysql service.
4. Connecting to mysql server through command line client.
5. Backup mysql db.
6. Restore mysql db.

Installing mysql server.
  1.  Download the latest version of mysql server from here 
  2. Download the query browser form here
Users can choose to choose to typical install if just need server to be configured with command line tool. Or choose to install the mysql workbench by choosing either custom or complete installation.

Setting up system environment for mysql.
To set up system environment for mysql follow the following steps.
1. Right click on My Computer and click on properties.
2. In case of XP , from the properties window click on Advance tab.
In case of Windows7 , from the properties window click on advanced system settings.
3. From the advance tab, click Environment variables.
4. From the Environment variables window choose path variable from system variables, and click on edit
5. Now append the mysql path to the path variable. Mysql ll be usually present in “C:\Program Files\MySQL\xyz\bin” 
In my case it is “C:\Program Files\MySQL\MySQL Server 5.6\bin
6. Click OK.


Find the snapshots below for the same.
Advance properties

Environment Variables


path variable 

To test the configuration 
1. Open RUN command and type ‘mysqld’ and press enter.
( For those who don’t know how to open RUN command
Press Windows key+R ).
2. If a console pops up and closes, system environment has been configured for mysql.

Starting and Terminating mysql service.
To start mysql service 
1. Open RUN command, type ‘mysqld’. The mysql service ‘ll be started.
To terminate mysql service
1. Open command prompt. 
2. Type in the following commands.
mysqladmin -u <username> -p shutdown
Eg:  mysqladmin -u root -p shutdown.
3. The console ‘ll prompt for password, enter the password and press enter.
Mysql service ‘ll be terminated.

Connecting to mysql client through command line client
To connect to mysql server, 
1. Open command prompt
2. Type in following command
mysql -h <hostname> -u <username> -p<password> dbname” //not recommended
mysql -h <hostname> -u <username> -p dbname” // recommended
3. Type in the password. Connection is created if u can see the shell change to mysql.
Below find the snapshots

Mysql Connect 
Mysql Connection Success

Backup mysql db
There are different ways to backup MYSQL db. Here i share 2 methods of doing them.
1. Mysql Command Line client.
2. Mysql Query browser.

Backup through Mysql command line client.
To backup only tables and data.
1. Open command prompt.
2. Type in the below commands.
mysqldump -h <hostname> -u <username> -p --databases dbname1 dbname2 >backup_location
Usage : “ mysqldump -h localhost -u root -p --databases test1 test2 >c:\backup\backup.sql
3. The console ‘ll prompt for password. Enter the password,  the backup ll be stored at the specified backup location.

To backup Entire database including procedures and triggers.
mysqldump -h <hostname> -u <username> -p --routines --databases dbname1 dbname2 >backup_location
To backup all databases.
mysqldump -h <hostname> -u <username> -p --routines --all-databases  >backup_location

Restore Mysql DB.
To restore mysql db.
1. Open command prompt.
2. Type  in the following commands
mysql -h <hostname> -u <username> -p dbname < backupfile.sql
Enter  the password when prompted.
OR
mysql -h <hostname> -u <username> -p dbname
Enter the password when prompted.
source backupfile.sql
Or
\. backupfile.sql

Backup through mysql query browser
Content ll be updated soon.....


Friday 25 April 2014

AutoUpdating of C# Application.

Updating the software to customers every time manually is gruesome task.This consumes lots of time of effort.
           Example consider , releasing a new version within short span of time, or installing it to large no of customers really tough right. 

Here i share a simple way of updating the software Automatically.

The main idea behind Auto-updating the software is,

  1. Provide a way to track the latest update available , this can be achieved through updating the version in a Settings file or DB. In this example am using a settings file.

  2.  Replacing the setup with a newer version.This can be done in 2 ways.
    1. Probably the easiest one, Set the DetectNewInstalledVersion and ReplacePreviousVersions property in visual studio to true.

    2. Using WMI to read all the software's installed then uninstall the previous version of the application being upgraded. The code is explained below.                                                  Note: Add a reference to System.Management object.


  3. Installing the new version ,

First step in creating this application is hosting the settings file.

       The best place would be in a server accessible to all the users.
Assuming that u have hosted the settings file in your server "http://myserver/" ,
For the first time , the application has to be installed manually, later on for the next updates setup files can be placed in the server.
lets continue with Coding part.

Creating a form


The form basically consists of 2 labels , progressbar , button and a backgroundworker.

Dwelling into the functionality.

    The  Application mainly consists of the following functions.
  1. private void Form1_Load(object sender, EventArgs e).
  2. private void backgroundWorker1_DoWork(object sender, DoWorkEventArgs e)
  3.  private void backgroundWorker1_ProgressChanged(object sender, ProgressChangedEventArgs e)
  4. private void btnupdate_Click(object sender, EventArgs e)
  5. public void CheckUpdate()
  6. private bool installupdates()
  7. private void unisntall()
  8. private void downloadFiles(string filename)  

Lets understand the functions more clearly.


1.  FORM LOAD event.

         In the form load event , just display the product version.

        private void Form1_Load(object sender, EventArgs e)
        {
            lblversion.Text = this.ProductVersion;
        }

2. ButtonClick event.

     This this we trigger the background job to start.

        private void btnupdate_Click(object sender, EventArgs e)
        {
            if(!backgroundWorker1.IsBusy)
                backgroundWorker1.RunWorkerAsync();
        }

3. Backgroundworker_Dowork event.

        Here we call the CheckUpdate() to perform the update tasks.

         private void backgroundWorker1_DoWork(object sender, DoWorkEventArgs e)
        { 
            if(!backgroundWorker1.IsBusy)
                CheckUpdate();
        }

4. Checkupdate function

       performs the update tasks.

         /// <summary>
        /// performs the update tasks
        /// </summary>

        public void CheckUpdate()
        {
            /// gets the product current version.
            version = new Version(this.ProductVersion);
            DataSet ds = new DataSet();
            try
            {
                /// downloads the settings file containing the version information from the server.
                downloadFiles("version.xml");
                ds.ReadXml(@"D:\test\version.xml");
                backgroundWorker1.ReportProgress(40);
                foreach (DataRow row in ds.Tables[0].Rows)
                {
                    /// compares the product version and the latest version available from the server.
                    if (version.CompareTo(new Version(row[0].ToString())) < 0)
                    {
                        ///update available.
                        ///downloads the updates(setup file).

                        backgroundWorker1.ReportProgress(70);
                        downloadFiles("application_name.msi");

                        //installs the updates.
                        isInstalled=installupdates();
                        if (isInstalled)
                        {
                            backgroundWorker1.ReportProgress(100);
                            ///if u plan to uninstall manually, call this function
                            ///currently not called.

                            //  unisntall();
                        }
                        else
                            ///report error.
                            backgroundWorker1.ReportProgress(-1);
                        return;
                    }
                }
            }
            catch (Exception e)
            {
                MessageBox.Show(e.Message);
                backgroundWorker1.ReportProgress(-1);
                return;
            }

            backgroundWorker1.ReportProgress(99);
        }


5.Backgroundworker progress changed event

         /// <summary>
        /// Updates the progress bar and status of the operations.
        /// </summary>
        /// <param name="sender"></param>
        /// <param name="e"></param>

        private void backgroundWorker1_ProgressChanged(object sender, ProgressChangedEventArgs e)
        {
            switch (e.ProgressPercentage)
            {
               case 40: lblstatus.Text = "Checking for updates...";
                    progressBar1.Value = e.ProgressPercentage;
                    break;
                case 70: lblstatus.Text = "Downloading necessary components...";                   
                    progressBar1.Value = e.ProgressPercentage;
                    break;
                case 80: lblstatus.Text = "Installing components...";
                    progressBar1.Value = e.ProgressPercentage;               
                    break;
                case 90: lblstatus.Text = "Removing previous components...";
                    progressBar1.Value = e.ProgressPercentage;
                    break;
                case 100: lblstatus.Text = "completing Installation";
                    progressBar1.Value = e.ProgressPercentage;                   
                    this.Hide();
                     MessageBox.Show("Restart the application for the changes to take effect.","Restart");
                     this.Close();
                    break;
                case 99: lblstatus.Text = "";
                    progressBar1.Value = 100;
                    this.Hide();
                    MessageBox.Show("Product is upto date");
                    this.Close();
                    break;
                default: lblstatus.Text = "update failed";
                    this.Hide();
                    MessageBox.Show("Update failed");
                    this.Close();
                    break;
            }

        }

6. InstallUpdates function

        /// <summary>
        /// Installs the new version of application
        /// </summary>
        /// <returns></returns>

        private bool installupdates()
        {
            bool appInstalled = false;
            backgroundWorker1.ReportProgress(80);
            ///creates a process to install the process.
            Process p = new Process();
            ///Msi installer
            p.StartInfo.FileName = "msiexec.exe";
            ///parameters to install the application.
            ///  /i = install
            ///  /qb = basic user interface

            p.StartInfo.Arguments = "/i \"tempfolder\application_name.msi\"/qb";
            p.Start();
            //wait for process to complete
            p.WaitForExit();
            if (p.ExitCode == 0)
                appInstalled = true;
            return appInstalled;
        }

6. unistall function

   uninstalls the previous version of the application

         private void unisntall()
        {
            ///selects all installed products
            ManagementObjectSearcher mos = new ManagementObjectSearcher("SELECT * FROM Win32_Product");
            ManagementObjectCollection moReturn = mos.Get();
            foreach (ManagementObject mo in moReturn)
            {
                ///checks for the application name and version
                if (mo["name"].ToString() == "setup_name" && version.CompareTo(new Version(mo["version"].ToString())) == 0)
                {

                    backgroundWorker1.ReportProgress(90);
                    //uninstalls the application
                    mo.InvokeMethod("UNINSTALL", null);
                    backgroundWorker1.ReportProgress(100);
                    return;
                }
                else
                    continue;
            }
        }

8. Downloadfile function

    Downloads the files from the server , "http://myserver/".
        private void downloadFiles(string filename)
        {
            try
            {
                System.Net.WebClient webclient = new System.Net.WebClient();
                webclient.DownloadFile("http://myserver/" + filename, "tempfolder" + filename);
            }
        } 


Last step , Creating a setup project.

Follow the steps below.

Download Source.


References 

  1. Installing MSI through command line.
  2. http://msdn.microsoft.com/en-us/library/System.Management%28v=vs.110%29.aspx